In the last article, we guided you through how to set up Google Analytics to
track Destination Goals, Pages per session, Events on your website
The Growing need for Custom Event Tracking
I am a technologist-turned-analytics professional since five-plus years. Recently, a friend asked me how he
can set up a custom event tracking on his small business website and understand his site’s user behavior
better.
Until a few years back small businesses and personal bloggers were satisfied knowing their number of
unique visitors and page views on their website. But everyone now wants to understand much more than
mere page views. They want to know how many users clicked on different buttons, watched a video,
checked details of a product, or clicked on third-party advertisements among other things. There’s an
increasing demand to understand how different users are engaging on their digital assets.
There are many objectives you can use your website for, and there are as many activities to monitor on a
website. While big businesses have dedicated teams, small companies usually have a single person
managing both the analysis and the technical setup of their analytics account.
Thankfully setting up basic goals and even the advance custom goals in google analytics isn’t difficult, as long as you know the right steps. And in this article we are going to go through exactly that. I’ll walk you through the steps of setting up custom goals in the simplest way while you enjoy your coffee!
Overview
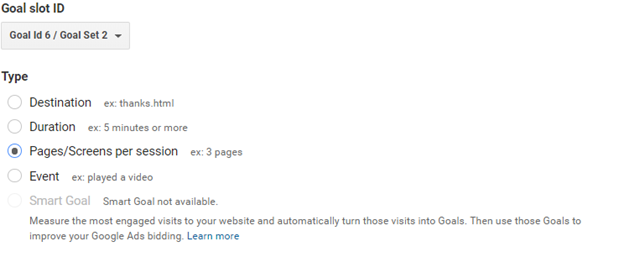
First, for the sake of revision, let’s go over the four main types of custom goals available in your Google
Analytics account. If you are already familiar with them and want to understand only the last one (the
“Event” goal type), then scroll down to point 4: “Setting up an Event goal”. A glance at the screenshot below
will explain to you the four main goals that you can customize in Google Analytics.

You’ll notice that the first 3 goals are very intuitive and directly usable. Once set, they will give you an x%
conversion in the past 7 days. But the last one will return a 0% conversion. Let’s first review the three
simpler goals and then we’ll be able to understand the event goal in detail.
Setting a Destination Goal
All you need for this is to give the URL of the page which you identify as a success on a page visit. For
example in e-commerce websites, when a person makes a purchase and reaches a “thank-you” page, it’s a
success. So visiting the thank-you page can be a goal.
All you need to do is enter the URL of that page as a destination, www.yourexamplesite.com/thanks.html. It’s
possible that your website may have different query parameters, so you can use options like “URL Begins
with”, “URL Ends with” or “Regex”.

Setting a Duration Goal
This refers to the number of minutes (or hours) spent on your website by a user. This goal’s use can vary
based on the purpose of a website. Spending more time on your site may be desirable, but it doesn’t mean
a sure shot conversion. It can also mean that your website is not easy enough to help users accomplish
their tasks quickly
However, for content-oriented websites such as that of newspapers, bloggers, magazines or video content,
a duration goal can be important. So based on your site’s purpose, it might be a good idea to set different
time duration goals.
As you can see below, you can enter a time duration for this goal and you’ll be set to track all users who
cross that mark.
Pages/screens per session
This is the number of pages viewed in a single session or visit. If a visitor closes the website and then
returns the next day, or after a gap of 30 minutes on the same day, it’s called a new session.

Events
An ‘event’ is any action taken by a user that marks an interaction with your website after landing on any of its pages. The simplest example is when they click on a button like “Buy Now”, or “Learn More”. It can also be used for options like downloading a PDF or E-book, among other actions.
Also Find Few trending courses on demand for you and your friends
IBM Sterling B2B Integrator Online Training – 100% Practical
asp .net with c# course training in Hyderabad
100% Real-Time DevOps Training Hyderabad by Certified Professional
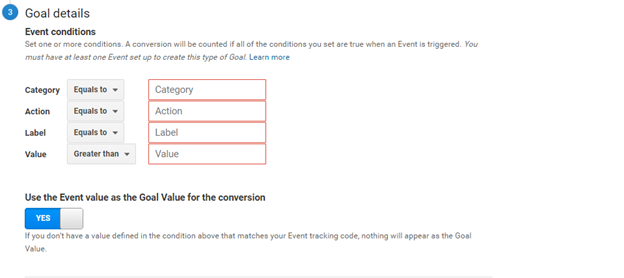
Clicking on a button is typically referred to as a CTA, short for “Call to Action”. When you choose this option in your custom goals setting, you’ll see this window open up with four options:

All four fields or parameters are simple to enter. GA needs you to define each event with these four fields so that you can easily identify them during analysis.
You can write anything in these parameters, but it’s recommended that you define them in a way that makes the most business sense for you.
For example, if you are managing a store selling electronic gadgets and accessories, you may want to fill it like this :
A. Category: Category of the product. Example, ‘Headphones’
B. Action: Let’s say a user clicked the ‘Add To Cart’ button. Then you could write ‘AddToCartClick’ in your action. In case you have an additional button for ‘Features’ or ‘Learn More’ for that product, you can have an additional goal and define its action as ‘LearnMoreClick’ for that button.
C. Label: Label can be anything which helps you recognize or group your events better during your analysis. It can be the name of a ‘Campaign’ or a ‘Brand’. For example, ‘CollegeCampaignSonic’.
D. Value: This is an optional value, mostly used to set a revenue number. It can be used to set a specific number like $50, or to take a dynamic value from the revenue variable of your page, like $(“PriceVariable”). Note that $ here is a jquery identifier and not the currency dollar. Picking up an ID would depend on the price or cost variable defined in your HTML.
After you define your Event goal type values here, the tricky part starts. Since every other goal in GA is directly usable once defined, it’s confusing to many why the event goal doesn’t start to work right away. That’s why when you click on ‘Verify the conversion’ for this goal, you see a 0% conversion.
To correct this 0% conversion, you need to integrate the settings of this goal with the actual click event or the custom action responsible on your website, for this goal.
Integrating custom event tracking with the HTML of your website
Sometimes, business users (especially non-technical ones) tend to feel anxious when anything related to coding comes up while doing their analysis. Thankfully Google has made it very simple to tie any custom event tracking need that needs to be integrated with your website. Only if you’re managing a complex e-commerce website would you need help from a developer, which in most cases you would have access to if you are working in a mid-size company.
For integration, Google has already set up a standard template function that it expects you to use when tracking a custom event on your page. It’s one line of code, for which you have already set values in your GA account. Marketers or coders typically refer it to as the GA-Send call which is in the below format:
ga(‘send’, ‘event’, [eventCategory], [eventAction], [eventLabel], [eventValue]);
The actual JS function in your HTML page may be in single line or may look like this for easy readability:
ga('send', {hitType: 'event',eventCategory: ‘Headphones',eventAction: ‘AddToCartClick',eventLabel: ‘CollegeCampaignSony'});
Note that the values in this function must match the values entered in your GA account while setting up the event for its respective parameters. Now you still need to tie the above GA send call with the actual action on the button.
For example, you want to tie the above function with the click on the ‘Add To Cart’ button. The only step you would need to add is to include this function on the ‘onClick’ action event for that button ID.
Integrating the above cited Google Analytics Event script inside your HTML
<script>
$(document).ready(function(){
  $("#exampleAddNowButtonID").click(function(){
    ga ('send', 'event', 'Headphones' , 'AddToCartClick' , 'CollegeCampaignSonic');
  });
});
</script>
Wrapping up
This brings me to the end of this article. I have tried to explain with simplicity and details that I felt lacking when I was learning how to set up custom tracking for my own requirements. Hopefully, this step by step guide helps you in setting up tracking for your custom goals that best fit your needs.
Related Articles
Best online computer courses learning sites in India | IT courses
How to switch from manual tester to automation Testing and Benefits
Best practices for maintaining testing framework using Java Selenium webdriver
Advantage of hands-on Apache Spark training – Demand for Spark Developers
SEO course Training in Hyderabad – 100% Live Project Experience
